
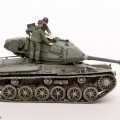
I thought I´d share with you my latest project in 1/72nd scale, a Pbv 301 apc that was used by the Swedish army before the more known Pbv 302. The 301 was built using the hull of the Strv m/41 (Swedish manufactured CKD TNH aka Pz 38t). The model is a conversion from Unimodels Munitions Schlepper 38t, which I bought as a spare parts kit for my recently finished Strv m/41. By conversion I mean that I have so far used the bottom plate and the lower front plate of the kit. I will later use small details like suspension, wheels, track and perhaps tools.

A Pansarbandvagn 301 in retirement outside the armour museum at Axvall. (Photo by Thord Wedman)
Day 1 and 2
Drawings that was bought from SPHF were scanned and downscaled to 1/72, then printed out. With the help of the drawings I made pieces of plasticard that made up a framework of the hull which I then skinned. When everything was fairly dry I sanded, added putty, waited for it to dry, sanded some more, added more putty and so on. Finally I had a smooth box like hull to work with. The next major step was the creation of the rounded part that supports the turret, and the cupola that is the turret, on which the 20mm gun will be mounted. For this I used milliput. After I had a shape that I thought I could live with I put the model aside and went on with life.

The picture shows progress after two evenings.
Day 3 and 4
The third day of the project was spent on sanding the part that I made with milliput. Unfortunately I didn´t mix the putty thoroughly, probably due to the fact that the milliput is a few years old and might not be really useable, so there were spots in the shapes that were still soft. To encase the soft spots and to smooth the surface some more I added some tamiya putty. The sanding was continued on the fourth day. I also started working on the 20mm gun and its mount. It was a handful. On the Pbv 301 the automatic gun is mounted externally, and it has got a somewhat futuristic look about it that I like. The gun was made by sandwiching some pieces of plasticard, that I sawed, cut and sanded into shape. I also did the same to make the large mount that also doubles as a mounting post for the hatch in the cupola. I then made the gunners sight, and the external AA-sight. I thought the AA-sight was to be one of the most tricky items to manufacture, but then I hadn’t yet made the chute for the spent shellcasings that is mounted underneath the gun. I made the chute out of thin aluminium plate, and it was quite fiddly, even without having to look for it on the floor.. damn pincers..
Finally the gun and it´s mount was done. There are still some detail missing, like lifting eyelets and some small details on the gun itself. But I´ll do them later when I´ve tended to the rest of the Pbv.


The work of day 4, the gun and its mount.
Day 5 and 6
After a break in the work on this project because of IPMS Open and the following need for R&R, I have been working on the commanders cupola, that is placed on the left hand side, just forward of the roof hatches over the troop compartment. I´ve also started working on the drivers hatch. No pictures yet, but they will come later.
Day 7 and 8
The commanders cupola is in place, so is the drivers hatch. Neither is completely finished, but the rest will be done at a later stage, when I get down to detailling. I have also added three bases for antenna mounts and started working on the engine hatch.


Day 7 and 8, the commanders cupola and drivers hatch in place.
Day 9, 10 and 11
There has not been much work done on the Pbv 301 lately, but I have managed to make the hatches above the infantry compartment, a bit more detailling done on the engine hatch and I have also begun working on the rear doors. I have also added putty and sanded the hull in places where I felt the need for some more of this kind of treatment. My hat off to those who can present crisp, clean scratchbuilds that are pure white from perfectly cut plasticard, without a trace of gray putty anywhere to be found. How do they do that? I suppose they cheat, and spray the model white before presenting it.. 
I also tried to scribe the jount that separates the drivers hatch from the hull, but it ended up slightly misaligned, so more tamiya putty and more sandpaper.. By the way, I find the Tamiya putty better to work with than Italeri´s. First I thought they were the same, but after I bought my first tube of tamiya putty, I changed my mind. No, I don´t get payed by tamiya, not yet anyway. It feels like the tamiya putty is harder, when dried. It also looks like there are tiny metallic particles in the putty, which could explain why it feels harder.
Well, that was a lot of text about almost nothing. Unfortunately there are no pictures at this time, but I´ll add some photos when the back doors are in place.
By the way, the count of days are not reflecting real days since the project started, but rather the evenings spent on the projects. Just to give a small hint on how long a simple project like this can take.
Day 12 and 13
One evening was spent making the stowage box that is mounted on the right side of the vehicle, the other evening was spent on making the exhaust box for engine and radiator exhausts. I finally got around taking some pictures too.

Day 14 and 15
The rest of the boxes on the sides are done, and work has begun on the suspension and tracks. I will use the tracks and weels from a UM kit of some Pz 38 (t) based vehicle.

The next time you see it, it will hopefully have a nice pair of tracks.
Day 16 – One step backwards and one step forward
No, it doesn´t. The tracks are not yet added. After having the opportunity to climb around the real vehicle once again I realised I can not live with a small error on the model. The “box” for the exhausts is about 1 millimeter too long, which places the pox aft of the exhaust in the way of the roof hatch when it is opened. Not that the hatches can be opened on the model, but they have to appear to be. I managed to pry off the various stowage boxes and the exhaust without inflicting too much damage on the hull. There was however some need for more putty. No worries, I have a whole tube full.


I´ll have to make a new exhaust box, since the old one doesn´t look too good. I tried to shorten it by one millimeter at first, but it’s too bent up.
To somewhat compensate for the step backward, I went ahead and mounted the suspension and road wheels.
The rest of the evening was spent making the Pbv 301 walkaround that can be found on this website.
To be continued….

looking good Erik, keep working on the Pbv 301 so i can see it finished soon. I can´t wait for the 302 kit…. want one myself.
Hi Erik
Great bit of modelling, can’t wait to see it finish.
I’d love do have a go at building one of these in 1/35 from a Dragon Aufklarungspazer 38(t) myself, where did you get the scale drwaings from ?
All the best
Steve
Thankyou Steve
The drawings are from the Swedish Armour Historical Association, SPHF. You can find info on available drawings and on how to order here: http://www.sphf.se/tillsalu.htm
I hope you get your project going.
Best regards
Erik G