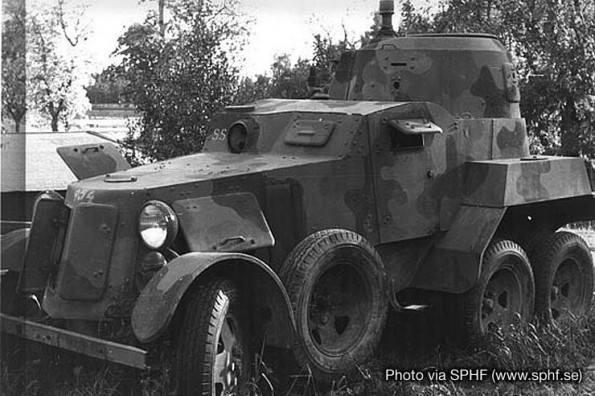
It is a little known fact that the soviet armored car BA-10 served in the swedish army during the second world war. Three BA-10 was given to sweden by finland, who had taken them from the soviets during the war. The vehicles was used as command vehicles and was devoid of any armament except for a machinegun, ksp m/39 (8mm browning) next to the driver. Differences from the standard BA-10, that I have been able to find out so far is:
- No armament in turret. Mantlet faired over and some sort of viewport/hatch installed in the place of the gun.
- Periscope sight of the same typ as used on the Strv m/41 aka Pz 38t installed in place of the original sight.
- Antenna mount on hull in front of driver.
- Kulspruta m/39 beside driver instead of original machine gun.
- Door installed on rear armor plating.
- Different kind of mud guards over front wheels.
- Different kind of bumper.
This is what I have been able to puzzle together from the three photographs known to exist of these vehicles. You can see one of the pictures above, the others can be found at: http://www.sphf.se/Modellbygge/m31f/modell31f.htm and http://www.sphf.se/Axvall/pbil31.htm. Note that the second link leads to a page about pansarbil m/31, which is a different, swedish built, armoured car. Why the same number was given to the BA-10 is a mystery. Maybe because they both are lorries with an armoured cab? Who knows?
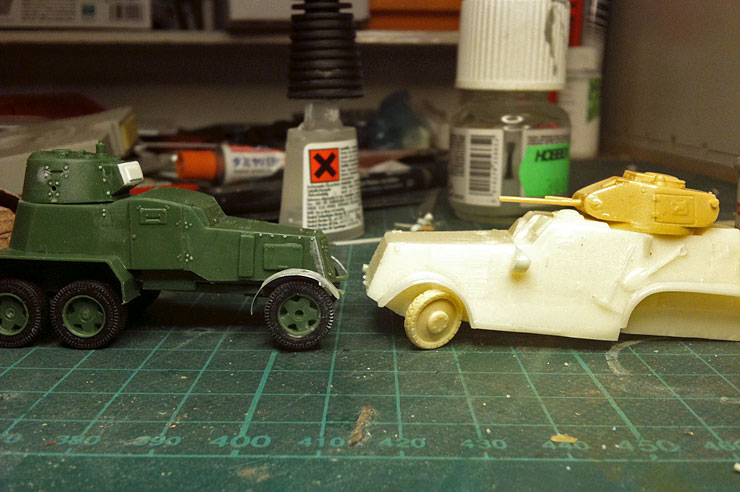
Since the modelling show C-4 Open in Malmö is coming up in a few weeks and my Piranha is far from being ready, I thought that converting a UM 1/72 scale BA-10 to a Pbil m/31F could be good idea, just so that I would have something new to bring to Malmö. Also the theme class of the event this year is about models relating to sweden during the second world war. I thought an armoured car from that period could be a fitting contribution.
So, what have I done so far? Apart from just building the kit from the box I have done a few of the necessary modifications, new mud guards from thin amuminium plating and the changed mantlet on the turret. I have also added a few details that was missing from the kit, such as rivets/bolt heads and a pair of vision slits and pistol ports on the turret. I made the rivet heads by stretching a styrene rod and cutting thin slices of the resulting thread. The discs were then dipped in liquid cement and placed on the vehicle. This way of making tiny rivets is new to me but so far the result looks good, so I think this is a technique I´ll use in later projects. I know I will have to use it in some places on the Piranha II.


October 5
I have added a few small details, like the step below the rear door. I also remade the sight since it was a bit overscale. I hope the new one looks better. Since there is not much left to do before painting I have started to think about how to paint the vehicle. There were a few variants and color schemes used at the time, and it is not known which colors that were used on the Pbil m/31F. I made a color profile using the colors used on the Strv m/40K that belonged to the armour museum of Axvall just to try it out.


October 6
I “wasted” a bit more time on the color profile adding more details. I made a second one featuring the three colours used on the Strv m/37 that Axvall had. The Stridsvagn m/37 features a darker green with blotches of black and grey. There is a contemporary variant of camouflage that features four colors as well, grey, green, brown and black. I used it on my Strv m/41 conversion. However I have not found anything indicating that there are four colors used on the Pbil m/31F.


October 9
A few more details added. It’s time for paint soon, just a few more details to go..
I am constantly discovering new things that I “have to” do. Quite amazing actually, since I only have three photos as a reference. The last thing I discovered that I had to fix was the design of the rear part of the tool boxes. The tool boxes in the kit are just box like parts that are glued on to the rear mud guard. This leads to a gap between the box and the rear hull where it curves inwards. When studying the photo showing the rear of the vehicle, in order to check ut some details I discovered that the toolbox is shaped so that it fills up this gap. So I had to do that on the model as well.
I also made an antenna mount and an antenna. Looking at the photographs I realise that the mount is a bit overscale. I will not be able to make it thinner, but I will have to shorten it a bit.
The front end of the vehicle received a pair of headlights. The front of the headlights are completely flat in the kit, so I hollowed it out slightly with my demel. I also added a pair of tow hooks to the front.
The last items to be added was the footsteps next to the side doors. At first I was going to use the kit items, but they are very thick. So I made new ones out of thin aluminium.
That leaves a re-make of the antenna mount, an air horn and two pair of hooks, presumably for towing wire, to be done before painting.


October 10
Time to put on some paint..


This is pre-paint. Note the small size of the model. The super glue bottle is gigantic in comparison.


This is after the model received a coat of green. The green colour is a mixture of a vallejo light green, vallejo white and a little bit of JPS “swedish army light green” (can’t remember the number right now). I was planning on using the JPS colour as the foundation for some tinkering, but it is more of an apple green colour with a strong yellowish cast, and I was after something more pale and more green, not so much yellow. The camera is however lying, the colour that was used eventually was more yellowish than the images above hints.


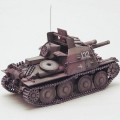
And finally, the brown and black is added. The camera is once again lyiong slightly. The colours are more vivid in reality. Maybe even too vivid and light. But a layer of weathering should take care of that. The brown is a mixture of sand, chocolate and flesh. The black is black mixed with a bit of sand. All colours are vallejo. I was thinking about spraying the pattern using my airbrush, but I realised I am lacking in the spraying-small-patterns-freehand-department. So I used a fine brush instead. The original pattern is hard edge, so it is very likely that it too was applied using a brush.
Before painting I studied the two photographs showing the left side, and I made a quick colour profile using a mirrored version of the one I did earlier. The three existing photos of the Pansarbil m/31F is said to be of the same vehicle. Either this is not true, and they are in fact two different vehicles, or the vehicle has been repainted at some point. The patterns are slightly different. The left side has fairly large blotches with relatively wide radiuses on the curved lines. The right side is busier, with thinner and more complex fields. More importantly, when comparing the picture showing the rear left side to the one showing the left side, the patterns don´t match. But I combined the both sides anyway, filling in areas not visible on any of the photos.
The Strv m/40K I have been loosely using as a “colour guide” has the wheels and area behind painted in a blue gray colour. I am toying with the idea of doing the same here (see the colour profile). It would be an interesting break in the all green camouflage pattern. But I haven´t seen anything like it on other wheeled vehicles, so it is probably not true to the original. The available photos say nothing in favor nor against. The wheels are all in one colour, they could be in almost any colour.
I am looking forward to weathering this little fellow..
October 18
This project has now reached its end. I have painted, weathered and made a baseplate/small viginette for the little armoured car. I came to the conclution that I didn´t like the brown colour. It was too dark. I wanted something looking a bit more like sand or mustard, so I mixed a new colour and painted over the old brown. It looked a lot better. But I am still not happy with the green. It´s too vivid. But I dont want to repaint the whole model, so I will have to live with it.

The brown replaced by sand.
After the repaint it was time for detail painting, markings and preparations for weathering. The detail painting was limited to painting the headlight reflectors silver, the tires a rubbery greyish black, and painting the machine gun barrel black.
I finally got to use one of my Echelon Strv 122 decal sets, but unfortunately not in the way I had thought. I used some of the small number decals to do the ID number that is painted on the front and to the rear of the vehicle. The double S’es that stands for StridsSkolan (Combat school) was painted on since I did not have any suitable decals. (Well, now, when I come to think of it, weren´t there lettering on the same echelon decal set?). Anyway. Before the decals went on the model received a coat of clear varnish (Vallejo modelair). After the markings had been added I gave the model a wash using vallejo black that had been diluted with a lot of water.


The model after gloss coat, markings and a wash.
After the wash there was much rejoicing, since it was time for weathering. I first made a cocktail of flat varnish, dust colour (brown, sand, flesh, grey..) and a large amount of water. I airbrused this mixture on to the model in several thin layers, gradually flattening the sheen, making the colours paler and generally making it more grayish brown. Due to experience I made each cover thin, and I waited as long as I could between each layer (several seconds actually!  ). I know from experience that sometimes it can be to much too soon. But in this case I managed to stop in time.
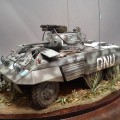
After the “base dirt” I added mud splatter using a mixed “dry mud” colour and a thin brush. I concentrated this work on the lower chassis trying to capture the look of wet mud splashing from the tires then drying in place.
After the plattered mud I made rain streaks to the vertical areas using a similar dried mud mixture. This time only I used enamel paint, since I wanted to be able to whipe it with a wide brush dipped in white spirit. The streaks represent mud that has been transported on the sides by falling rain. When happy with the result I finished the weathering by making a dry mud mixture out of various dry pastel chaulks. The dry pastel was ground using a scalpel and dusted on to the vehicle using a thick paintbrush. The model was then glued on to the base plate using cyano acrylate. Care was taken so that all six wheels touch the ground.

The finished result!
I will be adding more pictures showing more angles and more of the base plate soon. But not until after C4-Open that will take place next weekend.
To be continued…

Pingback: PlasticWarfare » Blog Archive » Swedish armour in kit form