At Plastic Warfare we are proud to introduce a new author on our site. Ingvar Sylegård. Ingvar might be most known for the splendid scratchbuilt 1/35th scale Stridsfordon 9040C that was featured in an article in AFV Modeller. In this article Ingvar explains how to make realistic looking camouflage nets of the Barracuda variety seen used by many countries around the world, among them, Sweden.
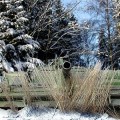
These types of camouflage nets have been used for masking vehicles, tents and other items for several decades. Most Swedish army men and women have, at some time been entangled in this type of masking net. As far as I am informed it was first developed by Diab Barracuda in 1957, -now a part of Saab industries. The camouflage net I try to simulate in scale is an older type, although still in use all over the world. It should not be confused with later masking developments, which also incorporates IR (infrared) and radar masking capabilities although there are some similarities in the making of the visible spectrum portions. To the point.
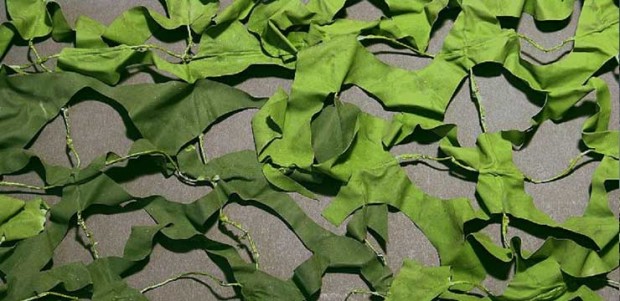
This is the camouflage net we will try to achieve in scale 1:35. I have made some trial and error testing and have found that it is not necessary to incorporate the net portion when making rolls of such a cammo net as well as cammo net draped on vehicles, personnel and such. It may, however be advantageous to also do the net part of the structure when simulating a cammo net hung like roofs over for example refuelling and reloading areas.
Let us have a look at the dimensions so that we know what we are dealing with. The mask width of the net part will be 2.2mm in scale 1:35 and the wire thickness will be 0.03mm. The thickness of the foliage will be 0.007mm (or 7µm) in this scale. We also need to consider that the whole structure is very flexible. Therefore the materials used for making a 1:35 scale Barracuda camouflage net needs to be thin, flexible and yet strong enough to be handled.
The material
I have made some trials with very thin annealed copper foil (25µm), household aluminium foil (15µm), plastic wrapping (very thin polyethylene foil) but none where able to withstand the stretching used when making this cammo net. Finally, I found something that was thin enough, and can be made strong enough, namely delicate almost translucent tissue paper. Choose a good quality of paper. The paper need to be reinforced, as it otherwise will rip apart once you try to stretch it.
First, mix some white glue (PVA glue –normally used for gluing wood).

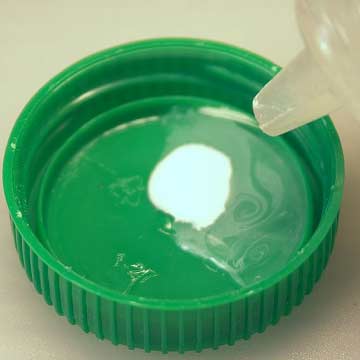

How thick the mixture is depends on the brand of PVA glue you use, as well as how brittle the paper is. You can always do a second coat. If the paper is neutral in colour, it is a good idea to mix some paint into the glue mix. I have tried Tamiya acrylic XF 65. This way you will not have to be extremely thorough when painting the finished net.

Apply the glue mixture to the paper and let it dry.
The tool
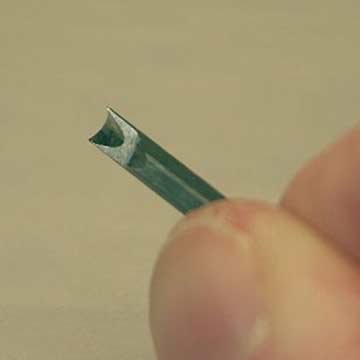
The tool I used is made from an old instrument tool. Yes, it would have been better to make a tool that could make more than one cut at the time, but that is version 2.0 which I have not got around to making yet.

The cut shall have these dimensions, 1.4mm high and 2.5mm wide. The measurements are taken from dissected piece of Barracuda camouflage net foliage, and scaled down to 1:35. The ones of capable of handling simpler math will be able to recalculate the figures given to the scale you prefer. Yes, it should be possible to make this even in braille scale.
It is now time to start the tedious work of cutting the foliage structure. For those of you who is of the opinion that putting a Friulmodel track together is boring work, stop reading now.
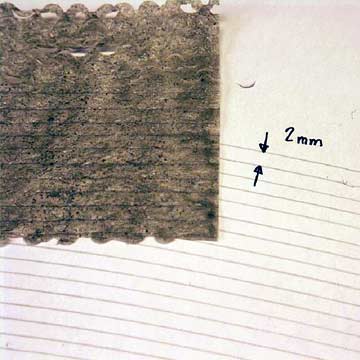
It is a good idea to draw some lines to follow to get the foliage structure nice and tight. 2mm is a proper distance. You can also see that I tinted the glue mixture with some Tamiya XF 65. This way, sloppy painting work in final stages will not be so evident.
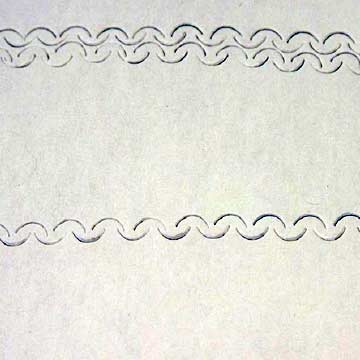
This is the way the cuts are arranged. Yes, it will take some time to get a decent piece of cammo finished.
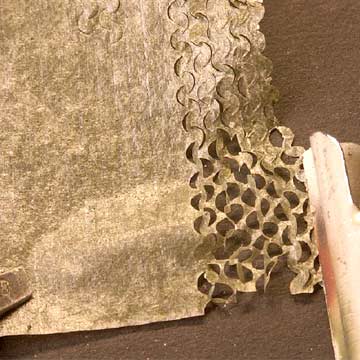
The cutting is done and you may carefully stretch the foliage part. If this were in the Barracuda factory, different coloured pieces of this foliage would be glued/welded onto the carrying net. However, in most cases the net can be left out in this scale. The glue will make the paper strong enough to withstand the stretching.
You can now apply water to the foliage. The PVA glue is hygroscopic and will be fluent again. This will make the foliage very soft. So, make sure that you use the right type of white glue. As always, practice make perfect. I have made at least three trials with paper until I was confident enough to actually use it on one of my tanks.
Fitting (-the fun part)
You can now start fitting your cammo to your tank, -or whatever you wish to hide. I used water, a brush and a pair of pliers to gently give it the shape I desired. Once dry, I carefully removed, and airbrushed it. It will be remarkably stiff once dry, depending on how much glue you applied. Again, practice make perfect.
Take care, the glue will leave stains on paintwork.
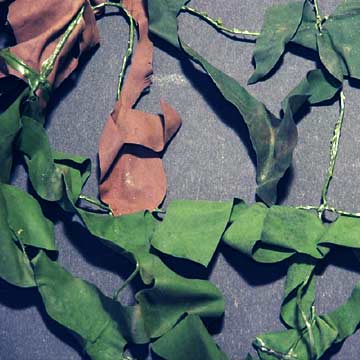
The colours of standard Barracuda nets do vary over the world. There are ones adapted for desert, jungle and woodland. The one below is frequently used, -at least in Sweden. The colours are dark green, light green and brown. I have seen nets in only two green colours as well as ones in two colour green, brown and black

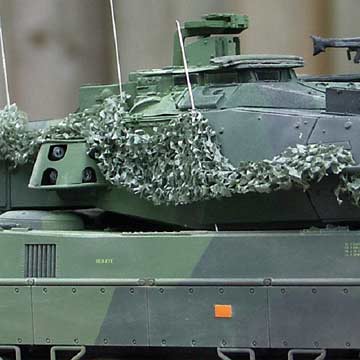
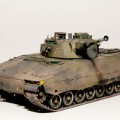
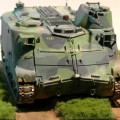
The finished result may look like this. What you see below is the right side of the turret on a Swedish Strv 122 (Leo 2A5), or more precisely a Tamiya/HKCW 1:35 rendition of a one.

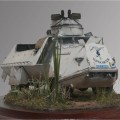
(And this is how it looks on a real vehicle, the editor adds)
Good luck everybody!
Ingvar Sylegård


Hi Ingvar, thanks for such a fantastic invention. I’m sure modellers all over the world just fell over themselves when they saw how impressive this technique looks. The catch is making a tool that can actually do this and I’m suspecting that most people are like me…not good at making such tools and have no way of making them either. Are you looking at making these for sale around the world as I’d definatly would buy 2 of them for sure. One in 32nd and one in 72nd scale would be my choice. Please let me know via my email if you are indeed able to get some into production and how we go about buying them from you. My email is gjkma77@tpg.com.au , I look forward to your reply and well done on another brilliant invention. Regards, Gavin Ashard
Mr Sylegard.
May I please congratulate you on not only your excellent research, but in your application of your superb modelling skills and techniques in developing this method for doing the Barracuda cammo netting.
I am always impressed by those who can dedicate the time and patience to help all modellers to refine and develop their own skills to ultimately help all in this hobby to produce more and more realistic finishes on their models.
You can justifiably feel proud in the finished result here, and I look forward to seeing other modellers using this technique on their own modern kits.
Well done Sir. It is exactly this type of achievment that is truly presenting to the global stage of our hobby just what the “Nordic Edge” is, and what it is doing to push the skills and talents of current modellers further.
Thank you from an old Armoured Corps soldier who got himself caught up in many a camouflague net on more than one occasion!
Shane Black.
Australia.
Absolutely fantastic job, Ingvar! Best cammo net I’ve ever seen and you didn’t cose the easiest one of them all either.
Now and then a modeller brakes a long time established barrier and goes down in armour modelling history for pushing the limits a bith further towards reality. This is defenitively such an occasion.
Congratulations and thank’s for the article!
Regards,
Ulf Andersson
hello
very well done
many thanks and congrats for your excelent tip, you are the man of the year
it’s really to make, i had just try with your article and the the result is terific
thanks again for your help for the nightmare of many modelers
Great tip. Congratulations, Modern camouflage nettings has been one of the most difficult to replicate in small scale and your tip surely made it a bit easier for me. Step by step photos sure helped out a lot.
Cool, do you think I could use it for extended track skirts on my strv 122?
Thanks for the tip!
Here´s a cheap idea i got for creating the tool used for creating this camo net. I´m guessing that every half decent modeller owns a dremel tool, then you need a grinding and polish bit that can eat metal for the dremel. And finally you need a peice of metal tubing (most hobby stores sell them, in brass and maybe aluminum variants. And make sure it has the correct diameter for making the holes in the net.
Step 1: Take the peice of metal tube and cut a peice about 15 cm long.
Step 2: Use the grinding bit with your dremel to grind off half (and maybe a bit more, bu looking at the images above) the diameter in one end of the metal tube.
Step 3: Use the polishing bit with the dremel and sharpen the (half circle) edge from the inside.
Step 4: Add some flashy friction tape or something around the other end of the metal tube to give you grip of the thing, then net away. I guess that if you use a brass tube or something similary soft you might need to sharpen the edge after a while.
That´s all from me, cheers.
/Peter
Hello dear colleague modeller
I found your way very subtle and relevant. The result is fabulous
I tested it works and the result is conclusive.
Go to the site “Maquette Garden ” I speak of your process
Congratulations for this lengthy process.
Cordially
Joseph
Pingback: PlasticWarfare » Blog Archive » Realistic camo netting in 1/35th scale, again
Dear Ingvar Sylegård,
Excellent practical apporach to make a camouflage net! Well I was searching for cutting options and methods, preferrabley a cutting device for this application for which I am exploring the system and finding ways and means to pursue my Product development.
The article is very informative. If you do have similar articles, methods or known sources for Cammos and making a net i.e cutting, designs etc.. please do share your views.
Warm Regards,
Raymond Mendonce
India
Hi,
Just wanted to ask.
On some Strv 122s there are like mud flaps on the front. can you tell me how I can replicate this in 1/35 th scale? thanks.
Email me at Panzer.b@hotmail.com for replys
Hi Ingvar !
This article is Brilliant !!! Thanks very much, I’ll br trying this on a couple of my Leopard 2A5/6 builds.
That net really does look realistic on your model – well done !!
Cheers
Paul
Excellent tip – I was convinced I was looking at the real vehicle in ALL the photos!
Just wanna say that the last picture is of my old tank, “Vargtass”.
If you look closely in the bottom right corner of the picture, you can se my name on the side of the tank “VC R TINGLÖF” followed by the rest of the crew
Invagar
Found this a bit late I know- but what a job! aAsoloutely stunning rendition and as so many have already said, challanges us all to develop our skills.
Thank you very much!
Wow, I sell camo netting and look at it all day and that stuff on your models looks like the real thing!
Nice. I hope you do a separate piece on the creation of cheap MCS mats as I am generally unimpressed with the weight, thickness and uniformity of the resin conversions and would like to see more vehicles than just the Leopard 2A5/A6 covered.
Cool!!! =) Hi, from Russia with love =)
Really nice, but I don’t really understand what kind
of paper you used. Were can I get it and whats the
name of it?
Namnet på svenska hade klart uppskattats.
Regards johan
Hej Johan, silkespapper kallas det på svenska. Man får ofta porslin och glas inslaget i sådant papper.
lycka till!
mvh, Ingvar
Thanks for the great writeup Ingvar, I took your method and changed the material – vinyl. Using a computerized cutter I was able to make a cam net for a project of mine;
http://forums.army.ca/forums/index.php?topic=104820.25
Good evening from Geneva, Switzerland,
I was looking for something like “how to make camo netting iin 1/48”, and I found your way a few month ago.
I tried your method, but, but, lazy , laser cutted on silk paper (“prepared” with white glue and water). The machine ran for 2 hours, but the result is a GREAT camo net of 25cm x 25cm… But talking of “business” producing, it’s out of mind, depending also of the cost on the running time of the machine.
I would like to show you the result, and now looking for another cuting pattern insted of “C” and inverted “C”… Belive me or not, Barracuda System answered me that they can’t give me their pattern…
Hoping in a answer, best regards and happy modelling!
Thierry
Wonderful work – now are you able to sell it to us modellers!!
Paul